Wednesday, September 30, 2015

Pink Licorice

So I took a break from using my mold dividers and did a hanger swirl. I used a dark grey mica and was happy with the resulting black and mixed some pink ultramarine and hot pink mica for the pink.
A mix of Raspberry fragrance oil and Aniseed Essential oil make up the Pink Licorice fragrance.
I got some nice big bars from the batch. Using my silicone mold without the dividers means I can fill the mold all the way up and it stays full. I still haven't mastered pulling out the dividers without loosing soap.
Below is a photo of my Licorice soap from last year and the recipe. The recipe makes a little over 4 pounds, for my 3lb silicone mold I multiplied the amounts by .75
Recipe:
Lye/ Water Portion:
208 grams lye
539 grams water
Oils/Butters:
454 grams Coconut oil
398 grams Palm oil
100 grams Cocoa Butter
495 grams Olive oil
 
If you want to see my home made hanger you can check out this post.
Thanks for reading!
 

Friday, September 18, 2015

Lemongrass with Poppy Seeds & A New Soap Cutter!

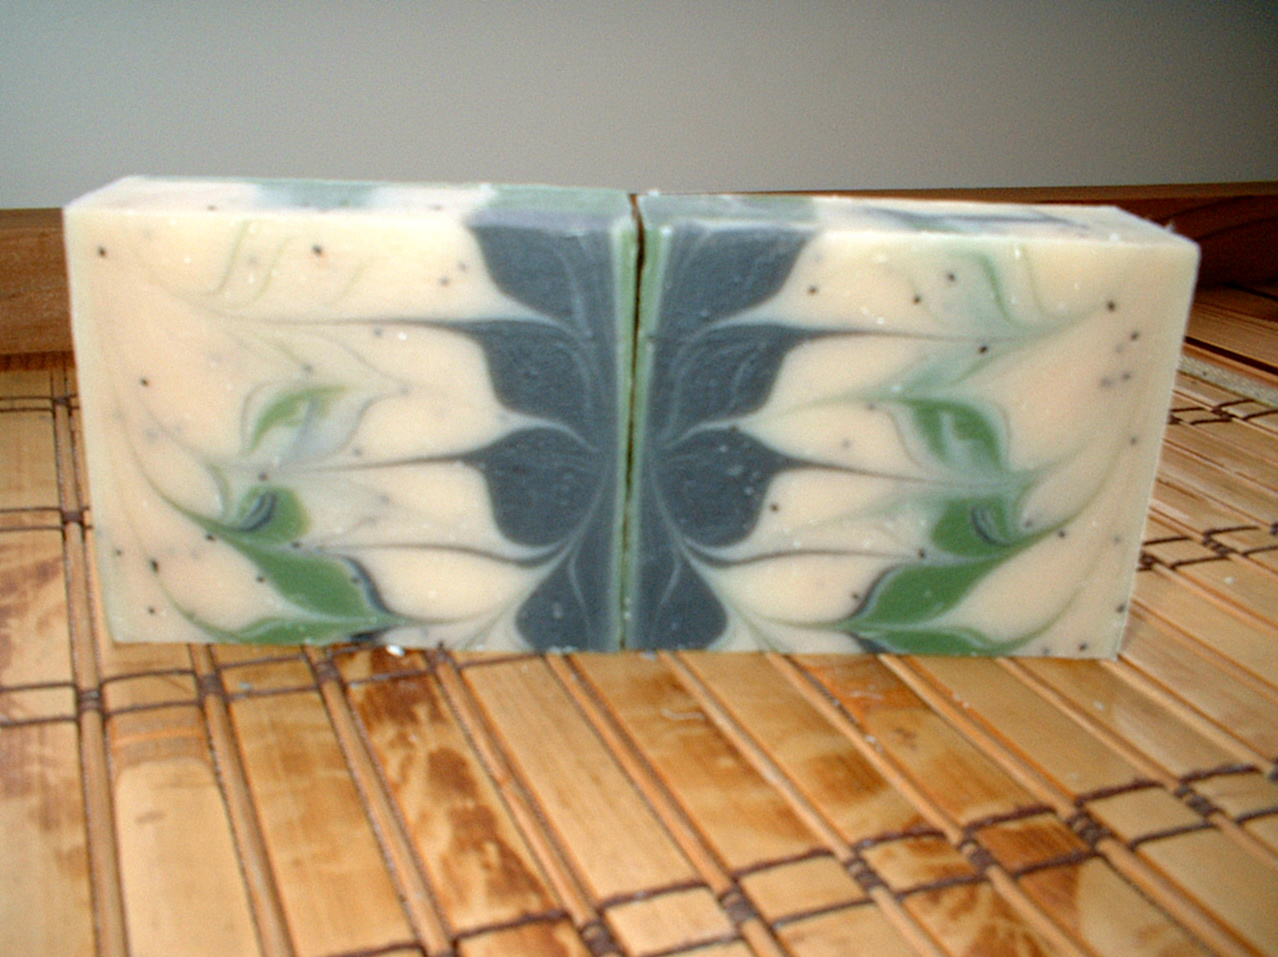
This a some Lemongrass with Poppy Seed soap I made last week. I coloured it with some Black Oxide, Chromium Green Oxide and Titanium Dioxide. I used the same mold as in my last two posts with the dividers. What's new is my nice straight cuts, I finally  bought myself a proper soap cutter. I have a picture of the cutter posted at the bottom of this post.
 Nice cuts means the bars are all exactly the same size and with the type of swirling I'm doing you get these mirror image bars and its easy to pair them up for photographs.
 I have four pairs, each pair is a little different. In the dividers I alternated rows of white and coloured soap, two rows of each. The coloured rows have a mix of green, black and a bit of white, I just kept layering in the different colours, this resulted in a real variety in the way the bars look.

I forgot to put my Titanium Dioxide/Water through a strainer, you can see little TD dots in the bars on the left.

 
But overall I'm really happy with this soap and I love, love this cutter.
Here is the cutter, I bought it  on Etsy from Workshop Heritage, if you look them up type the name
as one word. Thanks for looking!
Oops, I also meant to post a picture of the soap before I cut it. Here it is along with one of the 4 bars before they were split. They were taken with my tablet in a darkish kitchen :)
Thanks again for reading!


Thursday, September 10, 2015

Lavender, Cinnamon & Clove

 I made another Circling Swirl soap, this time scented with Lavender, Cinnamon & Clove essential oils. I forgot to take a picture of the soap before I cut it but I did snap the photo above right after it was poured.
Above are the cut bars and below are a couple of bars showing what the soap looks like on the bottom, its a nice pattern but very different from what the top looks like after the swirl.
See the previous post for recipe and details, thanks for looking!


Monday, August 31, 2015

Lavender Circling Swirl Soap

In a previous post I showed you this new to me mold, that came with dividers, that I wasn't really happy with. The soap that came out with the dividers was so wasteful and my swirl did not work either. I'm sure that wasn't all the mold's fault :)
Anyway, it also has dividers that go this way.
 
 
And I used it like that to make this.
If you look up Circling Swirl Soap on You Tube you'll have lots of choice for videos to watch. It's basically a Taiwan Swirl with the stick circled around the edge of the mold a few times to finish it. If you want the swirl to go all the way through the soap you need the dividers.
Here's a link to one of a few videos I watched.


 After I took the soap out if the mold I cut it into four chunky bars. The picture above shows two top view and two side view.  Now to see the design inside the soap, lay it with the side view up and cut through the side to make two bars.
And there you go! Now they won't all be exactly the same, the two pictures at the bottom of this post show each end of the soap loaf before it was cut. One end of the soap has quite a bit of purple and the other not so much.


I used my 3lb recipe as follows:
 
340 grams Coconut Oil
298 grams Palm Oil
75 grams Coco Butter
370 grams Olive Oil
 
156 grams Lye
404 grams Distilled Water
 
It's my usual 3lb (plus a few extra ounces) batch. Once traced (light trace) I added 4 tsp of Lavender Essential oil and then weighed out 12.5 ounces of soap in to 4 measuring cups. One cup got a little white clay and the other 3 cups each got one of the colourants.  I think you can see the order I filled the slots in the mold, Pink, Green, White and Purple. To help keep the dividers in place I went back and forth filling each slot a little at a time. After  filling the divided sections with soap I pulled out the dividers and then did the swirl. It works best if the soap is still on the thin side, this soap, especially the pink, was starting to thicken to I ended up with a slightly textured top. The next one I did has a nice flat top and I will post some pictures of that in a day or too.
Thanks for reading!

Saturday, August 1, 2015

Blackberry Rose

I finally got around to make some Cold Process soap in my silicone rose mold. It's fragranced with English Rose & Blackberry Sage Tea fragrance oils. I swirled a bit of the pink soap in with the purple and if you look really close you'll see a bit of a glitter where the two colours meet. I still had to support the sides of the mold to keep them from sagging, I just wish it was a larger mold. I made a two pound batch and filled three single cavity molds in addition to this one. Thanks for looking!


Friday, July 31, 2015

Little Lemongrass Bars

 This is a new to me mold that I received in June and just got around to trying. I was so excited to find a mold with dividers, there are two sets of dividers, one going the width of the mold as pictured here, and also a set going the length of the mold. 
 
I made a batch of Lemongrass scented soap, split it in half and coloured each half a different shade of green. I filled each slot with alternating greens, but not without some difficulty. The dividers are held in place at the top but not the bottom, so as I was filling each slot the bottom of the divider was moving and soap was running under the divider.
It took a bit of time too, so my soap was thickening as I was filling the mold. This ( I think) contributed to the amount of soap that was WASTED. You see, once the mold is filled the dividers have to be removed. A lot of soap was on the dividers when I pulled them out and I had my sink full warm water to plunk them into. Even if I'd had a few molds to scrape the soap into I don't know if I would have taken the time, my soap had gotten really thick by then, too thick to do the swirl top that I had planned.
 
And now look how my mold is only half full, that's why I'm calling these Little Lemongrass Bars, the mold was filled almost to the top with the dividers in it, not so much once the dividers were removed.
Here are the final bars. As you can see on the top I just did a simple swirl with a skewer and the colours ended up melding together. I could have made this soap is a simple drawer organizer but I will try this mold again. Maybe I did something wrong? Any ideas, let me know:)
Thanks for stopping by!


Friday, July 24, 2015

Rainbow Rose Soap


I've made another Melt & Pour soap project with my new Rose Silicone soap mold. I'm really happy that it turned our the way I had pictured it, that doesn't always happen. The three colours of glycerin soap were melted separately in measuring cups, there were only about 3.5 squares of each colour, I only wanted 1/2 pound total in glycerin soap. For the goat milk soap base I melted 1 pound. I poured the goat milk soap in to the mold and then poured one colour at a time, you can see the order in the picture. I normally would have tried pouring all the colours at once but I worked fast and it worked our pretty good! I scented with goat milk soap with English Rose fragrance.


My favorite parts are the purple and pink. I used coloured glycerin soap but added some purple mica to the purple and had to make my own orange by adding orange colourant to some yellow soap.


I still need to trim the bottoms a little but I think the side view has a nice rainbow effect too. Now I really need to try a cold process recipe in this mold! 

Thanks for stopping by!