Sunday, November 20, 2011

Reindeer!

OK this picture is totally off centre but you get the idea. The first batch I did of these (with some little friends) were made with un iced brownies and the instructions said to attach the smarties etc with melted chocolate. We used icing and it worked pretty good. You really need some white icing if you want to make brown eyes. I ended up three short for the amount of kids these were for so I went and bought a small slab of premade brownies that were already iced. Waayyy easier and since I didn't bake them they were less dry too:)

To Bleed or Not to Bleed

The top red layer of this soap would normally bleed into the the white layer over time but hopefully the thin brown layer will act as a barrier. If the red does bleed a little into the brown it shouldn't be noticeable. Non bleeding reds are hard to find and will usually bleed eventually anyway (with melt and pour).

Monday, November 14, 2011

Gift Tag Banners


These holiday banners are made from our luggage style gift tags. One package of 10 tags for $2.50 will give you enough tags to make both of these banners. I stamped the letters with some large alphabet stamps but you could cut the letters out of construction paper or do what I call the ransom note style and cut letters from titles in magazines.

Christmas Mice Soaps

Nothing says Christmas like little mice wearing stocking caps. These caramel coloured mice are made with honey (mostly) and goat milk soaps. All Milky Way seasonal molds are currently sale priced at 2 for $12.99.

Monday, October 31, 2011

Free Holiday Downloads


Get these cute tags to add to your packages and cards this holiday season. They are free from www.misscutiepiegoes80s.blogspot.com. I have been adding them to my gift tags and on to some takeout boxes as well.You'll need a colour printer and some white or beige cardstock.

Tuesday, October 18, 2011

Joy Mold Chocolates

If you fill the the bottom portion of the Joy mold where the letters are with chocolate, are you will get cute small bars that say the word Joy. I didn`t get a chance to trim the edges of these before I snapped the photo, its hard to get good light after work so I took this on my way out in the morning. Then after work I ate them, you know, to check the quality and all. I can assure you this mold makes great tasting chocolate. I`ll try it out for soap when I`m not so hungry.

Monday, October 3, 2011

Pumpkin Soap 2011

Here are pictures of the Pumpkin Soap from the October newsletter. The picture in the back is the soap after I had remixed it - it was originally three layers but the bottom layer overheated. The front left (darker) soap is the colour the second layer would have been, the lighter part in the corner on the same bar was the colour of the very top layer. The soap on the right is the same soap that gave me trouble in the slab mold, the layer that had the cinnamon e/o in it. It was fine as smaller bars because it didn't get as hot. The individual bars were poured from excess soap that didn't fit into the big mold and they ended up doing much better because they cooled faster. The darker bar and the bar at the back have gotten even darker since I took this photo because they have Vanilla fragrance ( and Irish Creme). The Vanilla will eventually turn the soap a dark chocolate colour. It would have looked really cool in layers :(

Friday, September 30, 2011

Pumpkin Soap 2006


From our Oct 2006 newsletter. We no longer carry Avocado oil but most health food stores do, or you could sub with more Olive oil and run it through a lye calculator.
We’ve brought in some pumpkin oil for those of you who want to try incorporating it into a pumpkin soap recipe. This recipe is for semi-experienced soapers. Here’s our new version of Pumpkin soap:

200 grams Avocado Oil

300 grams Olive Oil

100 grams Pumpkinseed Oil

396 grams Palm Oil

454 grams Coconut Oil


202 grams Lye

338 grams Distilled Water

100 grams each of canned pumpkin & cream mixed together


When your lye solution and your oils are both at 100 degrees, gently warm the pumpkin and cream solution to around 90 degrees. Add your lye solution to the oils and begin to stir, then add the pumpkin mixture. Bring to a medium trace and fragrance as desired.

(The Pumpkin Soap above is pictured with a couple of bath bombs.)

Friday, September 23, 2011

Pumpkin Soap 2004


Here's a rerun of a newsletter from 2004. Included is a basic recipe for Pumpkin Soap.
We’ve got some fun Pumpkin recipes in this newsletter for you to try. If you don’t make cold process soaps give the face masks a try. Both masks should make enough for you and a buddy- just make sure you have someone else to answer the door.


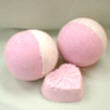
Pumpkin & Whipping Cream Soap (for those already familiar with making CP Soap)

This recipe is a variation of Cavitch’s Soap Essentials Bar from “The Soapmakers Companion”.

201 grams Sodium Hyroxide

269 grams distilled water

595 grams olive oil

454 grams coconut oil

397 grams palm oil

100 grams canned pumpkin

169 grams cream or milk


Mix sodium hydroxide solution and set aside to cool. Melt Coconut & Palm oils, add olive oil. When temps are just below 100F, mix the cream & pumpkin together & gently heat to around 90 to 95F. Add sodium hydroxide solution to oil, and begin to stir. Then get your warmed pumpkin/milk mixture into the pot and bring the soap to a medium trace. Fragrance as desired. We used Pumpkin Pie Fragrance (5 tsp) plus 2 tsp of Cinnamon Bun Fragrance. This soap takes about 4 weeks to cure.


What to do with the leftover pureed pumpkin- how about wearing it? Pumpkin contains enzymes that dissolve dead skin cells, and combined with an acidic fruit makes a great face mask. As with all face masks, please do a patch test before using.

Pumpkin & Honey Exfoliation Mask

2 tbsp pumpkin

2 tsp drained pureed pineapple (or papaya)

1 tbsp honey

4 tbsp cornmeal

Mix together and thin with approx ½ tsp of green tea or oil (sweet almond, apricot kernel, sunflower or sesame)

Add 2 or 3 drops of essential oil if desired

Massage into clean skin using circular motions gently buffing away dead skin cells. Leave a thin layer of the mask on the skin for 20 minutes. Rinse with warm water and gently pat skin dry. Apply a gentle moisturizer ( I don’t like applying creams with Alpha Hydroxy Acids etc right after using an exfoliating mask).


Pumpkin & Egg White Mask

For a gentler mask, wisk together 2 tbsp of pumpkin with 1 tbsp of pureed pineapple or papaya. Add 1 egg white and continue to wisk until well blended. Apply to clean skin and leave for 20 minutes before rinsing. Apply a gentle moisturizer.

Wednesday, September 14, 2011

Chocolate Milk with Caramel

Inspired by last year's Orange Chocolate Truffle, this soap has a delicious fragrance and fudge like appearance, so make sure you label it clearly! Recipe below.

For an 8 inch drawer organizer you will need 1.5 lbs of Goat Milk Melt & Pour.

 For the first layer melt 15 squares (.75lb) of soap. Stir in 1 tsp of Salty Caramel fragrance and 1/4 tsp of Honey Beige Mica. Spray with rubbing alcohol if the mica clumps. Pour into the organizer - I placed mine on a slanted board.

Melt the rest of the soap for the second layer and add 1tsp of Chocolate fragrance plus 1/2 tsp of orange essential oil (optional, I couldn't help myself). Colour this layer with 1/4 tsp of Cappucino Mica.  Your first layer should have a very thick skin on it by the time you have the second layer ready. Spray the soap in the mold with rubbing alcohol and pour the second layer on top. If your mold was on a slanted board put it flat before you pour.
If you have a 12 inch organizer you will need 1lb of soap for each layer, 2lbs total.

Melt & Pour soap is 10% off until Sept 30 so hopefully you will try this recipe!

Monday, September 5, 2011

Saturday, August 27, 2011

More Free Printables


For those with kiddos starting or returning to school these free printable signs from How Does She are really cute. Find them at http://www.howdoesshe.com/. Look under featured posts, you'll find other free printables there as well.

Thursday, August 18, 2011

Sand Toy Starfish

These bath bombs were made from a mold I picked up at Superstore. There was a package of sand toys on sale for 99 cents. There were six different shapes- crabs, fish etc- but I just wanted the starfish & 99 cents isn't a bad price for a single cavity mold. Should have bought more :) The colour on the bath bombs is from some clay beads I put into the bottom of the mold before packing it.


This is the starfish I used from the package.


Tuesday, August 9, 2011

Free Printables


I'm hoping the link I've posted works or you can download these free printables from the TomKat Studio site. They were designed for HGTV so you might find them there too.


Monday, July 11, 2011

Soap and Stamps


Just messing around with clear stamps in an eight inch drawer organizer and some melt & pour. Hope everyone had a good weekend.

Tuesday, July 5, 2011

Hawaiian Shores Melt & Pour

Made with 1lb of goat milk melt and pour base coloured with a liquid orange colourant and 2lbs of clear glycerin melt & pour base coloured with blue colourant. The orange coloured soap was poured into a loaf mold and then the blue soap was poured in right after. In a smaller mold this soap would have self layered but in a loaf mold you get more of a two colour tye dye look. This soap is fragranced with a blend of Ocean, Pineapple and Mango fragrances.


Friday, June 10, 2011

Recycled Grater

I've been waiting to do this for a long time. I just seemed so wrong to buy a new grater just to repurpose it. After all, isn't repurposing about giving new life to something old. Well the handle on our grater at home cracked the other day, I swear I had nothing to do with it, so out came the paint from my stash. Abracadabra, now you're an earring holder!


Incense Part 2


Since I had a lot of jars left over from making the Sugar Scrub last month, I used one for drying my incense. Let them drip/dry in the jar for a few days then flip them over to air dry. I was playing with paint and decided to paint a jar. Its not perfect and needs another coat but the writing and picture really pop, don't know if it shows in the picture. Since I still have 10 jars left I posted a couple of pictures of other ideas, I'm leaning towards using them for drinks on Canada Day.

Thursday, June 9, 2011

Soaking Incense


Here's 100 sticks of unscented incense soaking in a fragrance/DPG solution. I folded some tin foil up into a tray or boat type thing thats the same length as the incense. Cut the string that holds the incense together (it comes in a bundle) and lay the incense in the tray. Pour the solution over the end of the incense you would typically burn and make sure it gets really wet. Let it soak for a day and remove the sticks to let dry for a week. I usually don't burn mine, its fragrant enough on its own- but you can burn it once its dry. For 100 sticks you need 30ml of fragrance and 60ml of DiPropelyne Glycol. I used 15ml each of Vanilla & Pear. When you take the sticks out, let the excess liquid drip back into the tray. There should be enough to do another 25 sticks.

Wednesday, June 8, 2011

Mold Destash


I am selling off a few molds I've been hoarding. This one is a 3 cavity Milky Way Ladybug mold. I think its retired. I've used it a few times but it looks good as new. Its $5.00 for whoever wants it first. I think the soaps are about 3.5 oz each.


Wednesday, May 25, 2011

I'm Ready for My Closeup

Here's a sneak peak at something from the June newsletter. Gardeners soaps are great gifts and sellers for the summer and this will be a quick and easy recipe.


Milk Baths and Bath Bombs

The post below has recipes for bath bombs made with added powdered milk. If you like to take milk baths a milk bath bomb will dispurse the milk throughout the water so it doesn't float around in clumps. Another way to prevent clumping if you're just using dry milk in your bath (its usually granular) is to grind it into a powder, it will dissolve better that way. The recipes below are from a while ago, we refer to French Vanilla as a new fragrance. That must be from at least 10 years back! Anyway, they are oldies but goodies. We hope you try them.

Milk Bath Bombs

Bath Bomb Recipes

Oatmeal Milk & Honey Bath Bombs:

1 cup of powdered citric acid

2 cups (generous) of baking soda

¼ cup powdered milk

¼ cup of ground oatmeal

1 tsp sweet almond oil

1 tsp. oatmeal/milk/honey fragrance oil

Mix the dry ingredients together, then add 1 tsp sweet almond oil and 1 tsp of Oatmeal Milk & Honey fragrance. Mix some more and then spritz with witch hazel from a spray bottle about 15 or so times, just to slightly dampen. Now pack your molds before it starts to harden. We used the Milky Way Bee & Honeycomb 3 cavity molds - they're as cute as can be and smell yummy.

Chai Milk Bomb

2/3 cup milk powder, ground (will grind down to ½ cup)

½ cup powdered citric acid

1 heaping cup baking soda

1 tsp sweet almond oil

¼ tsp each cinnamon, cardamom & clove powdered spice

1 tsp Vanilla fragrance oil

Mix all ingredients well by hand, spritz lightly with witch hazel and pack into molds. We made up this recipe without the witch hazel and packed it into 2 part round molds. They really had to be packed hard to stay together and they took a few days to harden up.

Mocha Latte Bath Bomb

Use the first four ingredients for the Chai Milk Bomb and sift with 1 tbsp of cocoa powder. Fragrance with ¼ tsp coffee fragrance plus 1/2 tsp chocolate fragrance. Blend well, spritz with witch hazel and pack into molds.

Mocha Coconut Bath Bomb

Start with the Mocha Latte Bath Bomb and add 1 tbsp. of grated cocoa butter. Fragrance with ¼ tsp each of chocolate & coffee fragrance oil plus ½ tsp coconut fragrance.

Orange Creamsicle Bath Bomb

Use the first four ingredients from the Chai Milk Bomb and fragrance with ½ tsp each of Orange Essential Oil & French Vanilla Fragrance (our newest fragrance!).

Thursday, May 12, 2011

Website Changes

As the new website nears completion I'm feeling a bit of sadness about saying goodbye to the old one. Since we are now sending newsletters directly to subscribers they are no longer posted on the site. Here are some pictures from the newsletters we did back in the day when we just mailed out links. These newsletters will disappear when the switch in made :(


Rubarb Bath Bombs Feb 05


Coffee Scrub Soap Apr 06


Honey Carrot Soap Apr 07


Our first soap popsicles for Gaye's birthday
Sept 07

Salt Soap March 08


Sunday, May 1, 2011

Sugar Scrub Label

I couldn't get a good picture of the label for this scrub in the newsletter and thought you might like to know what it said. The larger text reads Citrus Mint & Sugar Hand Therapy. Below in smaller text: Wet hands and massage with Sugar Hand Therapy working in to nails and cuticles. Rinse and wash again if desired. Pat dry. External use only. I used an Avery address label and then put the label on a gift tag for the mason jar and on the paper band around the cosmetic jar. (cosmetic jar not pictured here) If you could smell how good this blend of Orange and Mint is you'd know why you really need to put external use only on the label.


Tuesday, April 26, 2011

Pinwheels on Packages


Paper pinwheels are really popular on cards these days and they look equally cute on your gifts. For the layered pinwheel on the left I used a 3 inch square and a 2 inch square. Use really strong double sided tape to hold the points of the pinwheel together and to attach the smaller pinwheel to the larger one. The single pinwheel on the right is done with a 3 inch sqaure as well and the boxes pictured are are 3 1/2 inches square. For larger packages you could do a slightly larger pinwheel, I think they would loose their cuteness if they were too big. Be sure to use double sided paper or, to coordinate with gift wrap, glue a square of the gift wrap to one side of the paper you are using for the pinwheel. Fun and easy !

Saturday, April 23, 2011

Birds Nest Cookies


I'm having a bunch of littles at the house tonight so we're going to make/decorate some of these. I'm using store bought cookies because we won't have much time. Picture is from pinterest.com. There may have been instructions. Happy Easter!

Friday, April 15, 2011

Spring Colours


Here's the Milky Way Fleur de Lis Tray in some non traditional colours ( I always picture this in brown or black and white).

Supplies used:

2lbs Goat Milk melt & pour

1/4 tsp each of powdered purple & pink colourant and 2 small containers

spray bottle of rubbing alcohol

2 tsp fragrance - I used Lily of the Valley

2 small measuring cups

1 larger measuring cup or double boiler - I used a double boiler


Cut ten squares from the 2lb slab of goat milk soap for the coloured fleurs.

Cut up the rest of the soap and start melting in the double boiler or larger measuring cup. This will take longer to melt than to soaps you will colour.

Melt 5 sqaures in each of the 2 small measuring cups in the microwave. Use short bursts, around 15 seconds. In your 2 small containers mix the powdered colourant with some of the rubbing alcohol. Spray and swish until you have a pourable colour with no lumps. Colour the 2 measuring cups of soap and fill the fleurs in the mold. Clean up any little mistakes -we all make them, and then spray with rubbing alcohol. Scent the melted non coloured soap and pour in to the mold.

Notes:

Even though I used a double boiler my soap was a little hotter than I would have liked so I set the mold in a few inches of cold water once it was filled.

The smaller the measuring cup, the easier it will be to control the pour of the coloured soap. If it starts to harden you can remelt it in the microwave, be careful not to overheat.


Wednesday, April 13, 2011

Mothers Day Cards


These are some of the cards I'm making for Mothers Day. Thanks Randell for the birds and branches!

Guest Fleur de Lis

Soaps made with the Guest Fleur de Lis mold cut and ready to wrap.