Wednesday, October 28, 2015

And This One Is Eggnog

 I started carrying Eggnog fragrance oil last year and just now tried it out in Cold Process soap. I knew it was CP safe and wasn't expecting any seizing or ricing but wondered how the scent would hold, and its holding really well. I like it so much I've made a second batch. I took about a cup of soap and added some bronze mica for an in the pot swirl and for the top, so this was actually a pretty easy soap to make.

I like the in the pot swirl, you don't have to colour much soap to get a nice effect.
Thanks for looking!

Friday, October 23, 2015

Playing with Mica & Stamping Soap

I was doing some organizing of my soap stuff and came across a Milky Way soap stamp. It had been used, but not for years.
I've tried it out recently on a couple of soaps I've made for the holidays. Above is a soap fragranced with Juniper and Fir and coloured with Chromium Green Oxide.

These pictures are not great, I have a hard time photographing mica. Above I hope you can see that I added some gold mica to the top of the soap and below are a couple of the bars I stamped.
(Edit: There is also some ash on the top of this soap that I have since steamed off making the gold pop a little more.)

And the soaps below are fragranced with Victorian Christmas and stamped with some white mica.
 

The snowflakes are rubbed with some of the same mica.

Here's the top of the soaps that I stamped, I added white mica mixed with a little bit of oil and then swirled it. If you do this right after you pour your soap the excess oil will be absorbed.
Any questions let me know and thanks for looking!


Friday, October 9, 2015

Coconut Lime Verbena & A New Swirl


I made this soap a few weeks ago fragranced with Coconut Lime Verbena. I have soaped with this scent before (10% off this month) and knew it would behave.
So I was giving my dividers another go and trying for a feathered looking swirl. I do not see feathers here but it still looks pretty. The two outer slots got white coloured soap and the two inner slots got yellow in one and a green/blue (I mixed 2 colourants together)  in the other. As you can see the blue is most dominant.

For the swirl, I started out doing the circling swirl I did here, then I went the length of the mold with my stick doing the letter S from side to side, I think I did two of the letter S,  either too many or not enough, or maybe that's not they way to get feathered swirls LOL. If anyone knows, clue me in will ya:) Thanks for reading and happy weekend!

Thursday, October 1, 2015

Pumpkin Soap 2015 & Recipe

 
It's become a bit of a tradition that I make Pumpkin soap every fall. This year I kept the recipe fairly simple, no coffee, cinnamon oil or other super heaters.  I left most of the soap un-coloured and added some Titanium Dioxide to the lighter portion.


I used a hanger to make the swirl. After filling the mold a little over half full with the un-coloured soap I poured a thin layer of the light coloured soap keeping it off to one side. The light coloured soap was not a complete layer, it went from end to end but not all the way across. Then I poured the rest of the un-coloured soap and topped it off with a full layer of the lighter soap. Once all the soap was poured I inserted my hanger and swirled it. I had no idea how the swirl was going to turn out!
To finish the soap I added some texture to the top with a spoon and then sprinkled on a little cinnamon spice. The pumpkins were really last minute. I made them a few days ago using some melt & pour soap and didn't think they were orange enough. By the time  decided to put them in the soap I was worried the top was starting to firm up so I stuck them in without measuring. You can see in the picture below they aren't even but I did manage to get a pumpkin on every cut bar.
Here's the recipe:
340 grams  Coconut Oil
298 grams Palm Oil
75 grams Coco Butter
370 grams Olive Oil
 
156 grams Lye
340 grams Distilled Water
 
50 grams of Pumpkin Puree
15 grams Cream
 
Mix the Pumpkin & Cream together and set aside. Once you have the lye solution and your oils ready, at around 90 degrees, warm the Pumpkin/Cream in the microwave gently - around 15 seconds should do. Add the lye solution to the oils and then the pumpkin mixture. Bring to a light trace and then fragrance as desired. Do not insulate this soap.
 
I fragranced my soap with Clove Essential Oil and Pumpkin Crunch Cake Fragrance Oil, 1 tsp Clove & 3 tsp of the fragrance & then separated out some of the soap to add the Titanium Dioxide,  I didn`t measure, it was just a guess:) Another thing I did was put the soap in my fridge for 30 minutes. After it had been in the mold for an hour it really started to heat up. If you pour it in to bar sized molds this won`t happen but in a loaf it`s possible. I didn`t want my soap top to be ruined so  cooled the soap for half an hour. The soap still gelled but thankfully did not volcano.
 
I think that`s it,if you have any questions let me know.
PS I couldn`t resist photographing the end pieces, that`s how happy I am with this soap!


Wednesday, September 30, 2015

Pink Licorice

So I took a break from using my mold dividers and did a hanger swirl. I used a dark grey mica and was happy with the resulting black and mixed some pink ultramarine and hot pink mica for the pink.
A mix of Raspberry fragrance oil and Aniseed Essential oil make up the Pink Licorice fragrance.
I got some nice big bars from the batch. Using my silicone mold without the dividers means I can fill the mold all the way up and it stays full. I still haven't mastered pulling out the dividers without loosing soap.
Below is a photo of my Licorice soap from last year and the recipe. The recipe makes a little over 4 pounds, for my 3lb silicone mold I multiplied the amounts by .75
Recipe:
Lye/ Water Portion:
208 grams lye
539 grams water
Oils/Butters:
454 grams Coconut oil
398 grams Palm oil
100 grams Cocoa Butter
495 grams Olive oil
 
If you want to see my home made hanger you can check out this post.
Thanks for reading!
 

Friday, September 18, 2015

Lemongrass with Poppy Seeds & A New Soap Cutter!

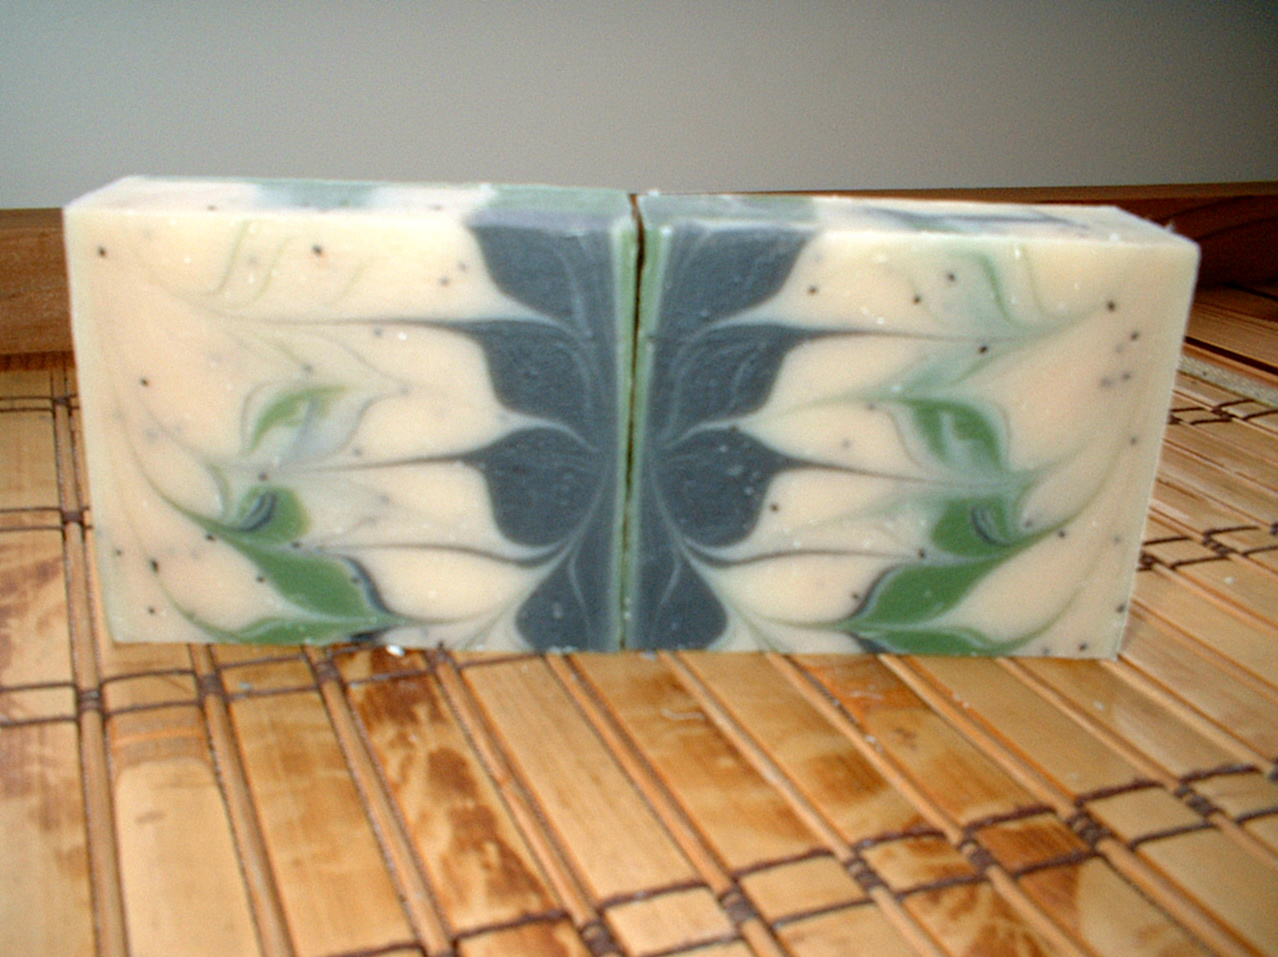
This a some Lemongrass with Poppy Seed soap I made last week. I coloured it with some Black Oxide, Chromium Green Oxide and Titanium Dioxide. I used the same mold as in my last two posts with the dividers. What's new is my nice straight cuts, I finally  bought myself a proper soap cutter. I have a picture of the cutter posted at the bottom of this post.
 Nice cuts means the bars are all exactly the same size and with the type of swirling I'm doing you get these mirror image bars and its easy to pair them up for photographs.
 I have four pairs, each pair is a little different. In the dividers I alternated rows of white and coloured soap, two rows of each. The coloured rows have a mix of green, black and a bit of white, I just kept layering in the different colours, this resulted in a real variety in the way the bars look.

I forgot to put my Titanium Dioxide/Water through a strainer, you can see little TD dots in the bars on the left.

 
But overall I'm really happy with this soap and I love, love this cutter.
Here is the cutter, I bought it  on Etsy from Workshop Heritage, if you look them up type the name
as one word. Thanks for looking!
Oops, I also meant to post a picture of the soap before I cut it. Here it is along with one of the 4 bars before they were split. They were taken with my tablet in a darkish kitchen :)
Thanks again for reading!


Thursday, September 10, 2015

Lavender, Cinnamon & Clove

 I made another Circling Swirl soap, this time scented with Lavender, Cinnamon & Clove essential oils. I forgot to take a picture of the soap before I cut it but I did snap the photo above right after it was poured.
Above are the cut bars and below are a couple of bars showing what the soap looks like on the bottom, its a nice pattern but very different from what the top looks like after the swirl.
See the previous post for recipe and details, thanks for looking!