Friday, July 22, 2016

Beach Waves

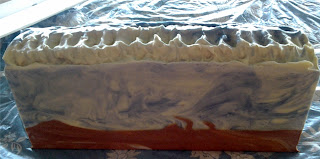
So I taped my mold back together, good thing duct tape comes on such a large roll, and made another tall and skinny soap. This one is scented with Coconut.
 See how well it matched my blue plastic tablecloth LOL!
 I did in the pot swirls for both parts using Honey Beige Mica, Blue Ultramarine and Titanium Dioxide.
I tried to make the tops look like waves and added some glitter to represent sparkles on the water.
 
I'm sure I'll be able to retape and use this mold a couple more times.
Any questions, let me know and thanks for reading!


Thursday, July 14, 2016

Tall & Skinny

At first glance this looks like nothing new, I've made and posted pictures of Black Raspberry Vanilla soap on here at least twice. Same old colours, hanger swirl etc. What's different here is the size. This is my first Tall & Skinny soap so I will admit to going with a tried and true fragrance and colours that I am used to working with too. These aren't the greatest pictures, I seem to have misplaced my camera and used my tablet for all of these photos. Anyway lets get to them because the surprise is a few photos down and its not the soap.


I made a full batch, I'll post the recipe at the bottom. It's my usual and is just over 4 lbs. For this amount of soap I added 5 tsp of Black Raspberry Vanilla fragrance. Its a well behaved fragrance so I was able to add it at a light trace, before I split the soap up for colouring.


The photo above is off in colour, I took it in a different light but it does show the tall and skinny size of the bar. The bars below are a little more true to colour. I used pink ulatrmarine powder for the pink colour and some purple ultramarine with some plum coloured mica for the purple. To the top I added a little glitter. These bars remind me of Stonehenge:)


Below is the soap in the mold. The surprise is I made that mold. Myself. All by myself, with some help from Youtube. If you do a search there will be a few videos and once you've seen these pictures you probably won't need to watch a video.

My mold was taped together with duct tape, I peeled it off to unmold the soap.


I'm hoping to retape the mold and use it again, at least a few more times.
I was dying to cut this and see how it looked inside. Overall I'm pretty happy with it.
Here's a couple more pictures of the mold. I used one of my Store Closing signs, its a plastic type of cardboard,  I can't spell the real name LOL.

This stuff is hard to cut. Next time I'll get myself a new sharp box cutter with a long blade!

Here's the size of mold I wanted: 11 inches long, 2.75 inches wide and 4.5 inches tall. The cuts I made were all 4.5 inches, the height of the mold, I had to make sure I had 2.75 inches between and 11 inches between the other way. I'm sure that makes no sense but hopefully the picture helps. Once the cuts are made the mold has to be scored (you cut through one layer of the plastic) so you can fold the sides and ends up. The recipe  used is one I adapted from The Soapmakers Companion and it was dumb luck that it filled the mold perfectly.
 
454 grams of Coconut Oil
398 grams of Palm Oil
100 grams of Coco Butter
495 grams of Olive Oil
 
208 grams of Lye
539 grams of Distilled Water
 
Follow all safety guidelines for making cold process soap. Work a little cooler, 80 degrees? I don't pay too much attention to temperature but with a mold this size the soap will heat up and gel without any help. At a light trace I added the fragrance, split the soap in three and coloured it. The white soap went into the mold first, then purple, then white, then pink. I topped it off with some leftover white and a mish mash of the remaining pink and purple. My hanger was a teeny bit shorter than the mold but I managed to swirl all of the soap. Here's a link if you want to see my hanger. For the fragrance, colourants and oils here's my website www.fragantmall.net
 
Thanks for reading my longest post ever, any questions let me know!


Sunday, July 10, 2016

Bath Bombs Revisit & Recipe

Since I started making bath bombs 18 years ago I've been using pretty much the same recipe, its very basic and I guess its kinda old school. You can easily use this recipe as a jumping off point if you want to make different variations but I would say all bath bomb recipes start out with these ingredients.


Bath Bomb Recipe

2 cups of baking soda
1 tsp of sweet almond oil
1 tsp of Fragrance or Essential oil
Witch Hazel in a fine mist sprayer


Mix the fist 4 ingredients really well then start spritzing with the Witch Hazel. Mix as you spritz, you are going for a slightly damp sand kind of feel. When you can squeeze some of the mixture in your hand and not have it fall apart you can start packing it in to whatever you are using for a mold. You can also shape it by hand into mini snowball shapes but most people like to use a mold.

You should be able to pop the bath bomb out of the mold right after you pack it. I have used one single mold for a batch of 18 bath bombs ( that was a double batch), they are pictured below and made with a sand toy.
And below are some bath bombs made in silicone ice cube trays. The fishy ones are actually toilet fresheners which are a type of bath bomb. The recipe is here.

Round bath bombs are usually made in two part plastic Xmas ornaments and you can also buy metal ones specifically for bath bombs too.

I also like to use Milky Way soap molds, below are bath bombs made in a Milky Way guest mold, I have some of these for sale and I really like the size for baskets and bath packages.
Since these are smaller I get 12 to 15 out of a batch. For average sized bombs you well get around 6.

Now for a few notes. The sweet almond oil adds a bit of moisture to the bath bomb and a bit of oil to the bath. If you absolutely hate oil in your bath, leave it out. I've used a little grated coco butter in place of the almond oil and that's really nice too. Some fragrance & essential oils are stronger than others and some people like more or less scent so the tsp of fragrance or essential oil is just a guide.
I will say if you are making smaller sized bath bombs, like ice cube sized, and you are only using one per bath you will probably want to add a little extra fragrance.

When I colour my bath bombs I tend to use a powdered colourant and mix it well with the dry ingredients. The little trees above were sprinkled with some cosmetic glitter after they were all unmolded and the glitter was set with a spritz of rubbing alcohol. The star fish bath bombs below were coloured gold for Christmas. I put each bath bomb in a shoe box and gave it a light spray with some rubbing alcohol that had a pinch of gold mica added to it. You have to shake the bottle to mix the mica with the alcohol.
I have used alcohol in place of witch hazel when making my bath bombs, the scent of the alcohol will evaporate but I prefer witch hazel which has almost no scent at all.

Here's a link to an old post with some recipes for bath bombs with powdered milk. Sorry there's no pictures, its a repost from a really old newsletter:)
Here's a link to Citric Acid on the website, and one to molds. We also have lots of fragrance and essential oils.
Anyway, hope this helps anyone who is new to making bath bombs!